Quantity Takeoff tools Extended further with CADPower-GeoTools V 17.18 Update
Bengaluru, India
CADPower V17.18 Update
** Bug Fix: TXT2MTXT : CADPower-> Text-> Editing-> Consolidate Text into MText (quick version):

A bug has been fixed in this command. It now creates MTEXT in the same location as existing original text objects with the same justification and extents as the original text.
The original appearance of the text is preserved. Text in user coordinate systems (UCS) are now handled correctly.
** Significant enhancement in Quantity takeoff related tools (CP_BOM, CP_FLEXITILE, CP_BUILDWALLS):
** Tile placement: CP_FLEXITILE: (CADPower -> BOM/BOQ Tools -> Flexi-Tile planner): The CP_FLEXITILE command places rectangular fixtures (tiles, panels, bricks etc.) over a poylgonal boundary. This command has been significantly improved.


The scope of this tool has been extended – it can now recognize the entity being placed as 3d also.
You can also attach material and dependent resources to each tile and enhance the scope of the quantity takeoff.
Here are a list of new features and improvements:
1. It is now possible to specify the element as 3D. This means that a depth parameter is also input in addition to the length and breadth. Specifying the element as 3D allows volume computation. With the 3D specification, the CP_FLEXITILE command is no longer a tile (2d) or flat panel (2d) placement tool but a tool that can be used to as model and quantify bricks, hollow blocks, 3d cladding, glass blocks and more.
2. The CP_FLEXITILE command now works in concert with the CP_BUILDWALLS command. When you pick a polygonal area to fill, the command now checks the layer name of the boundary and determines the floor name, element type, wall number etc.
The layer naming convention is set by the CP_BUILDWALLS command.
If the wall is in layer GROUND_WALL_A1, the elements belonging to that wall are placed in GROUND_WALL_TILE_A1. This makes it easier to manage data floor-wise, element-wise and wall-wise.
3. It is now possible to specify a joint offset distance while placing tiles. This feature was already available in the CP_TILEPLACE command and has been extended to the CP_FLEXITILE command also.
4. There is now an option to add material resources to each tile. The material resources are defined in the INI file used by CP_BOM command.
This section is used to define the quantity, cost and time used per unit resource.
Here, you must specify the resource name followed by (=) and the Quantity, Cost & Time per unit resource
For example:
<MaterialName>=<Quantity>,<Cost>,<Time>
The syntax of the resource definition section is shown below:
[RESOURCE&MATERIALS_DEFINITION]
Cement=0.1,5.0,3.0
Glue=0.05,2.0,0.0
[RESOURCE&MATERIALS_DEFINITION_END]
In the above example, ‘Cement’ is the name of the material (or resource) used. Its quantity (weight) required per unit tile is 0.1, Cost per unit tile is 0.5 and the time required per unit tile to place this resource is 3.0
This would also require us to specify the ‘weight unit’, ‘cost unit’ and ‘time unit’.
All of this is specified in the [SCALEFACTOR_RECORD] in the INI file that is created by CP_BOM command (as explained below).
[SCALEFACTOR_RECORD]
RECORD_STRUCTURE=#Desc,#Size,#Quantity,#UnitCost,#TotalCost,#UnitArea,#TotalArea,#UnitVolume,#TotalVolume,#UnitWeight,#TotalWeight,#Resource
LENGTH_UNIT_FACTOR=0.001
LENGTH_UNIT=mm
AREA_UNIT=sq.m
VOLUME_UNIT=cu.m
WEIGHT_UNIT=kg
WEIGHT_OF_EACH_STD_UNIT=1.0
WEIGHT_PER_VOLUME=1000.0
COST_UNIT=INR
[SCALEFACTOR_RECORD_END]
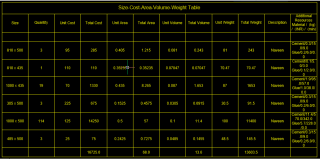
RECORD_STRUCTURE=#Desc,#Size,#Quantity,#UnitCost,#TotalCost,#UnitArea,#TotalArea,#UnitVolume,#TotalVolume,#UnitWeight,#TotalWeight,#Resource
The RECORD_STRUCTURE specifies the items that must appear on the table and the exported CSV file.
There are some new items added here.
The ‘#UnitVolume’ token displays the volume of each unit of the tile or panel. This is valid only if the element is specified as 3d.
The ‘#UnitWeight’ token displays the weight of each unit as computed from the volume and WEIGHT_PER_VOLUME. Valid only for 3d elements.
The ‘#TotalWeight’ token displays the total weight of the material (#UnitWeight x Quantity)
The ‘#TotalVolume’ token displays the total volume of the material (#UnitVolume x Quantity)
The ‘#Resource’ token tells the system to display material resources in the table, if available and attached to the entities.
To summarize, the new items here are the VOLUME_UNIT, WEIGHT_UNIT, WEIGHT_OF_EACH_STD_UNIT, WEIGHT_PER_VOLUME and COST_UNIT.
The WEIGHT_OF_EACH_STD_UNIT is the weight of each standard unit of tile (or panel or brick). This is for future use and not used at the moment.
The WEIGHT_PER_VOLUME parameter specifies the weight of the element per unit volume. The volume unit is as specified in the VOLUME_UNIT parameter.
The weight is as specified in the WEIGHT_UNIT parameter.
The cost unit is as specified in the COST_UNIT parameter and the time unit is as specified in the TIME_UNIT parameter.
** Improvements in CP_BUILDWALLS (CADPower -> BOM/BOQ Tools -> Draw Developed Walls from plan footprint):
The CP_BUILDWALLS command now creates walls in appropriate layers as determined by the floor name, and wall segment name.
If the current floor is GROUND, and the walls are designated A1, A2, A3 and so on, the walls in elevation are now placed in layers GROUND_WALL_A1, GROUND_WALL_A2, GROUND_WALL_A3 and so on.
The wall numbering is now alpha-numeric and can support names like A1, A2, A3 and so on.
** Bug fix in AutoCAD version:
CP_SCLEDIT: CADPower -> Blocks -> Block-related -> Interactive XY Scale Editor: The CP_SCLEDIT command would fail in AutoCAD after a certain number of XY scaling operations. This has been fixed now.
