
Synopsis:
This post explains the downloading, installation, configuration and licensing Standard Operating Procedures.
System Requirements:
The current version of BricsCAD is V24.
BricsCAD V24 has the following system requirements:
- A 64-bit operating system only, 32-bit operating system is not supported.
- Windows 10 or later. Latest updates must be applied.
- Minimum 8 GB RAM, higher RAM is strongly recommended for working with large data-sets.
- SSD hard-disk preferred for faster opening of drawings, saving etc.
- A normal graphics card is usually ok. More graphics RAM and better cards are recommended for better 3D performance.
What if you have older operating systems?
- If you have Windows 7, 64-bit operating system, it is strongly recommended that you use BricsCAD V20 (64-bit version) for a smoother performance.
- If you have a 32-bit operating system of Windows 7, you must use BricsCAD V20 (32-bit version)
- Operating systems earlier than Windows 7 is not supported.
- Latest available updates on Windows 7 must be applied.
System requirements for CADPower
- Same as those for BricsCAD. CADPower V24 (latest version) runs on both Windows 7 and 10/11.
Direct Download links:
Click here to download: BricsCAD V24, 64-bit version
You will need to register yourself first and have an email-id/password to login and download BricsCAD.
Designsense users can use our support email id: rakeshrao38300@gmail.com to login and Designsense 2020$$ as the password.
CADPower V24 for BricsCAD: https://www.thedesignsense.com/cadpower/cadpower_bricscad_en.exe
Download procedure for BricsCAD and CADPower
Click on the applicable links above and download both BricsCAD and CADPower.
Client-side Installation procedure for BricsCAD and CADPower
After download, just double click on the installation files and install it in the following sequence strictly:
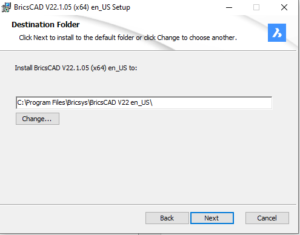
First BricsCAD must be installed. Keep clicking on Next…Next… and finish the installation.
By default, the installation folder will be “c:\Program Files\Bricsys\BricsCAD V24 en_US”. We strongly recommend that you do not change the default installation folder, and leave it as default.
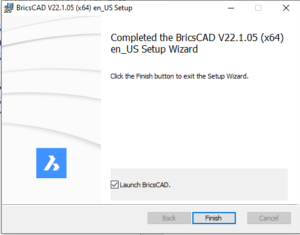
At the last screen during installation, click on “Launch BricsCAD” and start BricsCAD.
‘api-ms-win-crt-runtime-dll’ Error while starting BricsCAD
When you start BricsCAD software on legacy (older) operating systems, you may run into the ‘api-ms-win-crt-runtime-dll’ error. By legacy operating systems, I mean Windows 7 or maybe 8, and likely that it is a 32-bit OS, and even likelier that the user may have turned off automatic updates and the Windows has never received the latest patches and updates.
Please be aware that this is a generic problem with all software that requires the VC++ redistributables and not limited to BricsCAD only.
The first thing you can do is to sync your Windows with the latest updates.
To Install Windows updates:
- Go to Start > Control Panel > Windows Updates.
- Check for updates.
- Install all available updates.
- After the updates are installed, restart your computer.
- After restarting, repeat the steps above again until no more updates are available.
If, for some reason, if you want to skip the above steps, you still have a chance. You can install the Visual C++ re-distributable. If this is missing, you would get the above error.
Even if you have installed Windows updates, do this step explained here.
Installing Visual C++ redistributables:
64-bit download of Visual C++ re-distributable (Windows)
Applying either or both of the above fixes should help you to resolve the problem and BricsCAD will start correctly after this.
You can see a detailed explanation and step-by-step solution to this problem from another external site.
How to fix the missing DLL error?
Network license activation
If your network license is already setup, you can perform the network licensing by clicking on ‘Activate license’ and enter the address of your network server.]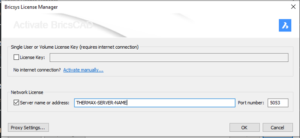
As shown in the above screen, you must click on the Network license area and enter the ‘Server name or address’. You can either enter the server name (as shown above) or enter an IP address in this box.
If your server uses a proxy, you must click on the ‘Proxy settings’ and enter the proxy server settings.
License key setup on the client-side
If you want to install the trial version of BricsCAD, you do not need to do anything more. BricsCAD will automatically activate the trial license. Please note that you need to be connected to the internet for trial activation to happen.
Your BricsCAD Pro V24 network license key is 2037-XXXX-0022-XXXXXX-81X1.
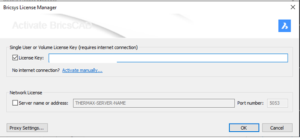
You must use this key and paste it in the space provided and click on ‘Activate license’.
Network licensing of BricsCAD
BricsCAD uses the RLM networking license software from Reprise software
Online activation – Server Side
First, you need to download the Bricsys Network License Manager from the below URL:
https://www.bricsys.com/bricscad/tools/Bricsys-NetworkLicenseManager.msi
Double click and run the .MSI file
More information on this can be obtained here:
The BricsCAD license activation requires an internet connection.
- Click the License activation shortcut in the operating system Start menu.
C:\Program Files (x86)\Bricsys\Bricsys Network License Manager\actNetworkLicense.exe
The Bricsys License Manager – Activate Network License dialog box opens.
- Enter the new network license in the License Key field and click OK.
- Click the License server administration shortcut in the operating system Start menu to open the Reprise License Server Administration.
- Click the Reread/Restart Servers option in the left menu.
Download the RLM Network administration guide here: http://www.reprisesoftware.com/RLM_License_Administration.pdf
Roaming a network license for stand-alone use
It is possible to roam a network license. Roaming means to borrow a license from the network pool for stand-alone use, and return it to the server when done.
This can be used in Work-From-Home situations, where other means like VPN may not be available.
To enable roaming, connect your computer to the network and go the BricsCAD license manager screen. This can be directly called form the command line by typing LICPROPERTIES or from the pull-down menu Help -> License Manager, and click on Manage Licenses.
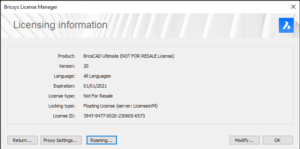
On the client computer, the Roaming option can be seen when a network license is activated.
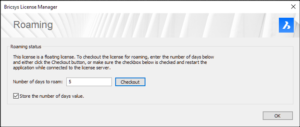
Clicking on it opens the second screen. Here, you can enter the number of days you want to roam (or borrow) the license. Upon clicking Checkout, the license will be added to your computer for the specified number of days.
At the end of the period, the license will stop running on the client computer and will automatically be returned to the license pool on the server.
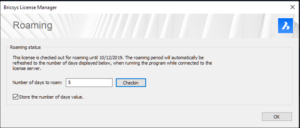
Licenses can be returned in advance also, before the expiry of the roaming period, using the Checkin option as shown below:
Reserving licenses for certain user groups
If you want to reserve a certain number of licenses for certain groups of users, it is possible to do so using options file. Such a file is named BRICSYS.OPT and has the following structure as shown below:
GROUP UNIT-1 15142 27578 23767 15493 30589 27511 27645 31645 18676 29564 20628 24140 24678 20966 29691 29691 19585 32204 hl9473 HL9473 Hl9473 ssp0107_09 Ssp107_09 SSP0107_09 33773 33155 31657 30635 34298 33979 33245 33678 90030_01 11524
INCLUDE bricscad GROUP UNIT-1 id=2
RESERVE 4 bricscad GROUP UNIT-1
GROUP UNIT-2
INCLUDE bricscad GROUP UNIT-1 id=2
RESERVE 20 bricscad GROUP UNIT-2
GROUP UNIT-3 22980
INCLUDE bricscad GROUP UNIT-3 id=1
RESERVE 2 bricscad GROUP UNIT-3
GROUP UNIT-4 72266 AK270 ak270 Ak270 10634 71472 22695 AK549 Ak549 ak549 10602 10616 33610 design.UNIT-4@thedesignsense.com Design.UNIT-4@thedesignsense.com 15111
INCLUDE bricscad GROUP UNIT-4 id=1
RESERVE 7 bricscad GROUP UNIT-4
GROUP UNIT-6 17595 11710 20180 34424 27393 72539
INCLUDE bricscad GROUP UNIT-6 id=1
RESERVE 6 bricscad GROUP UNIT-6
GROUP UNIT-7
RESERVE 47 bricscad GROUP UNIT-7
The syntax is as follows:
GROUP <group_name> <user1> <user2> …. [defines a GROUP of named users and assigns a name to the group]
INCLUDE bricscad GROUP <group_name> id=n [includes the BricsCAD license whose id=n to the specified group name <group_name>, the bricscad license id is specified in the bricscad.LIC file]
RESERVE nn bricscad GROUP <group_name> [reserves nn number of BricsCAD licenses for the specified group name <group_name>]
Other online resources
BricsCAD Online help: https://help.bricsys.com
BricsCAD V22 brochure: https://www.thedesignsense.com/bricscad/BricsCAD_V22_Brochure.pdf
CADPower brochure: https://www.thedesignsense.com/cadpower/Brochure_CADPower_EN_DS.pdf
CADPower commands list: https://www.thedesignsense.com/cadpower/CADPower_Commands_List_EN.pdf
AutoCAD-to-BricsCAD Migration Assistance Tools, by CADPower: https://www.thedesignsense.com/cadpower/A2B_Transition_Tools_By_CADPower.pdf
CADPower installation
Double-click on the cadpower_bricscad_en.exe file to install CADPower V22. Just click Next…Next…Next…
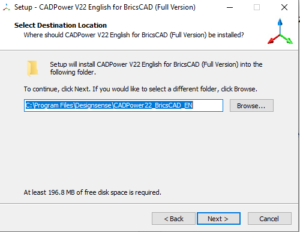
We recommend you keen the default installation folder “c:\Program Files\DesignSense\CADPower22_BricsCAD_EN” as shown above.
At the end of the installation, you will see this message which explains a thing or two about the final configuration to be done:
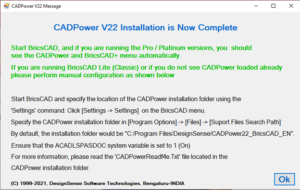
As noted above, you don’t need to do anything else if your install user login and CAD-user login in Windows are the same. CADPower will auto-load upon startup.
If not, you will need to perform the manual configuration as explained in the screenshot image above.
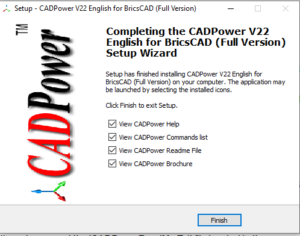
This is the last screen you see during the installation process. You may uncheck all these options, else it will open up the CADPower help, commands list, readme file and the brochure in your PDF reader.
Registering and licensing CADPower on your computer
CADPower registration and licensing can be done on a per-computer basis, or as a network license.
If you are registering on a per-computer basis, we will need the application key of each computer to generate the license file.
The application key can be generated by typing CP_APPKEY on the BricsCAD command line.

You can also generate the license file from the pull-down menu CADPower -> Display Application key by clicking as shown above.
The results of the application key are shown in a dialog box as shown above.
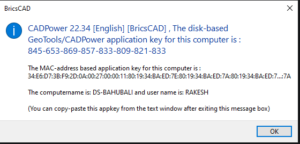
We recommend that you click on here, and you will see the application key results on the command line as shown below.

Once the software application key is generated, you must send the same to me (rakesh.rao@thedesignsense.com) by email and I will generate the license file and send it back to you by email.
The CADPower license file has the name CADPowerUser24_EN_BC.rgs.
Upon receipt of this file, you can activate the same from within the BricsCAD software from the menu item CADPower -> More Options -> Activate license
On clicking this option, it will ask you to select the license file, and it will be activated on the computer.
Please be aware that the login name during the license activation must be the same as the user login during the use of CADPower software. In case it is different (because system admin is activating the license and a different user is using the software), then the manual procedure must be adopted and the license file CADPowerUser22_EN_BC.rgs must be copied to the installation folder “c:\Program Files\DesignSense\CADPower22_BricsCAD_EN” directly.
You can then use CADPower uninterruptedly.
Other Frequently Asked Questions
Can I have multiple versions of BricsCAD installed on the same computer?
Yes, you can safely install multiple versions of BricsCAD on the same computer, and you can see in the Control Panel that each installed version appears as a separate entry.
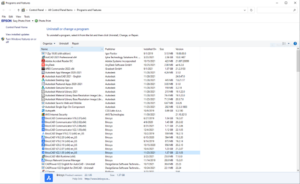
Multiple versions of BricsCAD will appear each as an icon on the Windows desktop and can be launched directly by a double-click.

Can there be multiple servers on which the BricsCAD network license be installed?
Yes, you can have the licenses installed on a mirror server, so that if one server is down, the licenses can be acquired from another server.
RLM provides the capability for a license server to take over the license compliment of another server which has gone down.
In order to activate the failover server, the license file needs to be signed by Bricsys. The client should send over the hostids and IP addresses of the primary and failover license servers so we can prepare the signed files.
Network requirements:
Network traffic between the Primary and Failover license servers needs to be allowed on TCP/UDP port 5053 and 5054
Setup structure:
- Primary Server (C:\Program Files (x86)\Bricsys\Bricsys Network License Manager)
Contains all the primary license files generated after the key activation.
(Optional) Contains options file
- Failover Server (C:\Program Files (x86)\Bricsys\Bricsys Network License Manager)
Contains all the primary license files generated after the key activation.
Contains the failover.lic license files
(Optional) Contains options file
- Client side (C:\ProgramData\Bricsys)
Contains a Bricsys-primary.lic
Contains a Bricsys-failover.lic
Failover server setup
- Install the Bricsys Network License manager on the failover server. Uncheck the “Activate a Network license” box.
- Copy all license files (files with a .lic extension) from the Primary server to the Failover server.
3.(Optional) Copy the options file (Bricsys.opt) from the Primary server to the Failover server.
- Once all files are in place perform a Reread/Restart of the RLM service on both the Primary and the Failover server.
- Copy the Bricsys-primary.lic and Bricsys-failover.lic files to the C:\ProgramData\Bricsys folder on the BricsCAD Client machines.
Note that failover license servers do not support license roaming operations. Actually, this is determined on a license pool by license pool basis – any license pool that contains any licenses from a failed server will not support any of the roaming operations.
Can BricsCAD network license be installed on cloud servers like Microsoft Azure etc.?
This is not allowed.
About the Azure server, according to EULA, the SOFTWARE PRODUCT may not be shared or made available to any user, even not the rightful user(s) under the license, via the internet, the cloud or any other similar technology. Cloud use of the SOFTWARE PRODUCT is only permitted via the Bricsys platform under a separate agreement (new contract).